


Walk Through – Portal Deployment Example Part 1
 Joe_Burrows
Cireson Devops Super IT Monkey ✭✭✭✭✭
Joe_Burrows
Cireson Devops Super IT Monkey ✭✭✭✭✭
As if the Cireson Portal V3.x
- V5.x Installation Instructions KB isn’t already long enough, here
is a basic example walking through of the installation of the Cireson Portal for someone new to SCSM and Cireson.
Important Note: This article is not meant to replace the install instructions; rather provide a Contoso example of what this process looks like after reading the install KB to help inspire what you may need to plan for as each environment will have different requirements. These steps are written for Cireson Portal v5 and SCSM 2012 R2, instruction may change with any future product releases.
I will break this down to the below three different discussion posts
- Portal Deployment Example Part 1 - Contoso’s environment and requirements + Permission configuration
- Portal Deployment Example Part 2 - Portal installation & Post installation configuration
- Portal Deployment Example Part 3 - Theming the Portal with the Contoso Corporate Brand
Contoso SCSM environment overview and requirements
Contoso has successfully installed Service Manager using a typical configuration for a small to medium sized enterprise in a single domain environment. Contoso intends to use Service Manager as the service management tool for both the Technology and Human Resource departments. Active directory connectors have been configured and have populated the CMDB with all AD users and groups. An SCCM connector has been configured to populate all computers configuration items. Support group lists for the incident and service request class have been populated with values ‘Service Desk’, ‘HR’ and ‘infrastructure’.
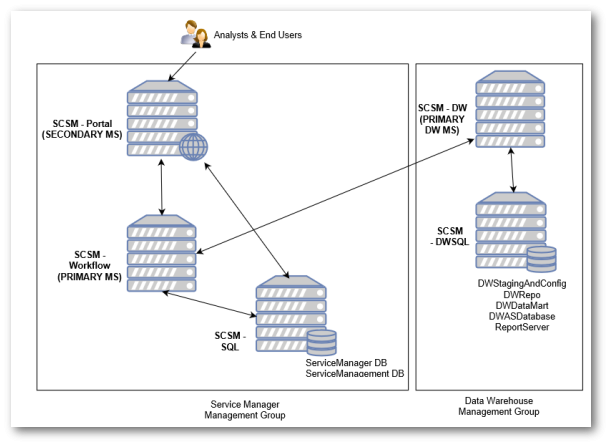
SCSM-Workflow: Primary Service Manager Management Server \ Workflow Server
SMSM-Portal: Secondary Service Manager Management Server, which will host the Cireson Portal
SCSM-SQL: SQL Server that will host the Service Manager DB and the Portal’s Service Manager DB on the same SQL instance
SCSM-DW: Primary Datawarehouse Management Server
SCSM-DWSQL: SQL Server hosting Service Manager Datawarehouse, SSRS reporting and Analysis services.
Permission Requirements
The Cireson portal requires the definition of three types of users Analysts, KB Managers and Asset Managers. AD group members of these user types will have visibility to different tasks, navigation views and options in the portal. Access to the configuration and work item objects themselves will depend upon the roles and scoping that are defined in service manager.
The key to remembering this is that the permissions are a combination of rights pulled from SCSM (via the cachebuilder, see cachebuilder overview kb for more details) plus the definition from one of the three user types (Analysts, KB Managers and Asset Managers) which can then be further scoped down in the admin settings of the portal post installation. A great diagram has been posted here showing this relationship between AD > SCSM > Cireson Portal.
Contoso
require the below roles configured and scoped, active directory groups are
already created for these departments so do not need to be created.
Service Desk Analysts
Contoso’s service desk team who require the ability to create Incidents, Service Requests, Problems and Change Request. The service desk also require the ability to create KB articles and perform Asset Management Tasks. They must not be allowed to see any HR tickets that are logged in the system as these contain sensitive information.
SCSM Administrators
Contoso’s domain administrators will require full access to service manager and the portal for deployment and maintenance.
End Users
All users in Contoso require access to the service catalog to log requests for the different services Contoso offer the business.
Human Resource Administrators
Contoso’s HR department require access to view, create and complete Service Requests that contain sensitive data.
Permission
Configuration:
1. Create Active Directory Groups
In Active Directory Contoso create the below new groups and nest the departmental groups that already exist in Contoso’s AD environment as per requirements
a. SCSM-Analysts
Members: Contoso-Servicedesk, Contoso-HR, Contoso-infrastructure
b. SCSM-KBManagers
Members: Contoso-Servicedesk, Contoso-infrastructure
c. SCSM-AssetManagers
Members: Contoso-Servicedesk, Contoso-infrastructure
d. SCSM-Admins
Members: Contoso-infrastructure

2. Create Portal Service Accounts
In active directory we will create the below service accounts as per the installation instructions in the before you begin section.
a. Create user account SCSM-Portal-AP that the web site app pool identity will run as.
b. Create user account SCSM-Portal-CB that the cachebuilder service will run as.
c. Add user accounts SCSM-Portal-CB and SCSM-Portal-AP to the administrator role in SCSM (SCSM console > Administration > Roles).
d. Add SCSM-Portal-CB as a dbo on the ServiceManager database in SQL.
e. Sync the AD connector and confirm all the groups from step 2 and the service accounts above exist in the CMDB. (Important to confirm this to avoid the error documented here)
f. Add SCSM-Portal-CB and SCSM-Portal-AP as local admins on the SCSM-Portal server.
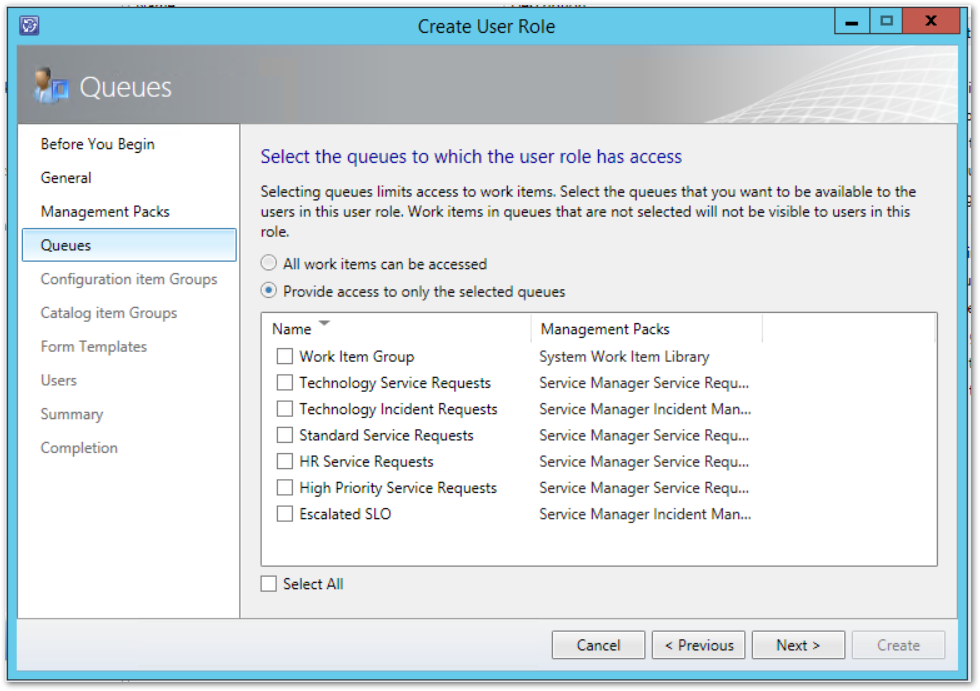
3. Configure SCSM Queues
In the SCSM console create queues and groups so the roles can be scoped as per the requirements above. More information on queues and groups can be found here
a. Create a new queue called HR Service Requests , targeting the service request class, the Criteria of this queue = Support group equals HR

b. Create a new queue called Technology Service Requests , targeting the service request class, the Criteria of this queue = Support group does not equal HR
c. Create a new queue called Technology Incident Requests , targeting the service request class, the Criteria of this queue = Support group does not equal HR
4. Create SCSM Roles
Following Ciresons recommendations and basics of security and role scoping, Contoso will create three custom roles and use the default administrator role.
a. Create user role based on the end user role named Contoso Portal End Users

Tick select all on the management pack prompt, select Provide access to only the select queues and ensure all queues are unticked (We do this as we want users to only get implied permissions to work items where they are the affected user, we don’t want them to have the ability to type the URL of a work item and stumble on a sensitive ticket for someone else)
Select All configuration items can be accessed

Select All catalog items can be accessed (In
this scenario we want all users to see all request offerings – if you want to only
show certain request offerings this is where you would target your catalog
item group of request offerings the user role can access)

Select All forms can be accessed

Add group Domain Users (you cannot user the authenticated users group with the Cireson portal) to the role and select Next, then Create.

b. Create user role based on the advanced operator role named Contoso Service Desk Analysts, tick select all on the management pack prompt, select Provide access to only the select queues and select Technology Service Requests and Technology Incident Requests, select All configuration items can be accessed, select All catalog items can be accessed, Select All Tasks can be accessed, Select All views can be accessed (this only applies to console views, the cireson portal has its own navigation node scoping), select All forms can be accessed, Add group Contoso-Servicedesk to the role and select Create.
c. Create user role based on the Service Request Analyst role named Contoso HR Analysts, tick select all on the management pack prompt, select Provide access to only the select queues and select HR Service Requests, select All configuration items can be accessed, select All catalog items can be accessed, Select All Tasks can be accessed, Select All views can be accessed (this only applies to console views, the cireson portal has its own navigation node scoping), select All forms can be accessed, Add group Contoso-HR to the role and select Create
d. Add group SCSM-Admins to the out of the box role administrator. This ensures the infrastructure department have full control over SCSM and the portal for administration tasks.
